The Ultimate Guide for Australian Buyers, Owners, and Builders
Introduction
Building a home is one of the most expensive investments you’ll ever make. Yet, 30% of construction budgets are wasted on rework due to poor planning (McKinsey, 2023).
3D GIS visualization solves this by letting you see your future home in photorealistic detail before construction begins. This guide explains how this technology cuts costs, speeds up approvals, and prevents costly mistakes for:
Homebuyers (avoiding bad purchases)
Landowners (optimizing designs)
Builders & Developers (reducing delays)
1. The Hidden Costs of Traditional Construction Planning
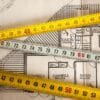
1.1 Design Flaws Lead to Expensive Changes
Problem: 2D blueprints lack real-world context, leading to:
Walls clashing with plumbing/electrical lines.
Poor sunlight exposure (requiring post-build fixes).
Solution: 3D GIS models simulate real-world conditions, flagging issues early.
1.2 Council Approval Delays
Problem: 40% of Australian builds face approval delays due to unclear plans (ABS, 2024).
Solution: Councils approve faster with 3D site plans showing shadows, drainage, and zoning compliance.
1.3 Material Waste & Budget Overruns
Problem: Builders order excess materials due to inaccurate measurements.
Solution: GIS-powered models calculate exact material needs, reducing waste by up to 15%.
2. How 3D GIS Visualization Lowers Costs
2.1 Preventing Design Errors (Save: $10,000–$50,000+)
Example: A Melbourne homeowner avoided $28K in rework when GIS revealed their dream kitchen wouldn’t fit the block’s slope.
2.2 Faster Approvals (Save: Weeks–Months of Delays)
Case Study: A Gold Coast developer cut approval time by 60% using 3D shadow studies.
2.3 Accurate Material Estimates (Save: 5–15% on Build Costs)
Data: Builders using 3D GIS reduce concrete over-ordering by 12% (Construction Tech Australia, 2023).
3. Real-World Examples from Australia
3.1 Homeowner Success: Avoiding a $35K Mistake
Scenario: A Sydney couple almost built on a flood-prone zone—GIS flagged the risk.
Savings: $35K+ in future damages + council fines.
3.2 Builder Case Study: Cutting Rework by 20%
Project: Brisbane townhouse development.
Result: Fewer change orders = $120K saved.
4. How It Works: From GIS Data to 3D Model
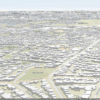
Step 1: Site Scan & GIS Integration
Drones/LiDAR capture topography, utilities, and zoning rules.
Step 2: Photorealistic Rendering
Your design is mapped onto the real-world environment (sunlight, wind, vegetation).
Step 3: Virtual Walkthrough
Spot issues before construction starts (e.g., “This balcony blocks the ocean view!”).
5. FAQs About 3D GIS for Cost Savings
Q: How much does 3D GIS visualization cost?
A: Typically 0.5–2% of total build costs—but saves 5–20x that amount in avoided errors.
Q: Can I use it for renovations?
A: Yes! See how extensions will look before demolishing walls.
6. Why Australian Builders Are Adopting 3D GIS
Trend: 62% of AU construction firms now use 3D modeling (ACA, 2024).
Key Benefits:
Fewer disputes with clients (“This isn’t what we agreed!”).
Faster sales for developers (3D renders attract buyers).
7. How to Get Started with 3DFlats.au
Simply provide the address of your project
Receive a Photorealistic 3D Model
Optimize & Build with Confidence.
Conclusion
3D GIS visualization isn’t just “nice to have”—it’s a cost-saving necessity for Australian construction. By catching errors early, speeding approvals, and reducing waste, it pays for itself 10 times over.
Ready to Save?